JNR vapes aren't typical disposables — they have a refillable pod system, auto-feed mechanism, detachable components, and dual vaping modes. If you've only ever used sealed all-in-one disposables like RAZ or Geek Bar, JNR has a short learning curve. This guide walks you through every step from unboxing to daily use, covering both the P4 Stellarc and P5 GlassRock.
Step 1: Unboxing — What You Get
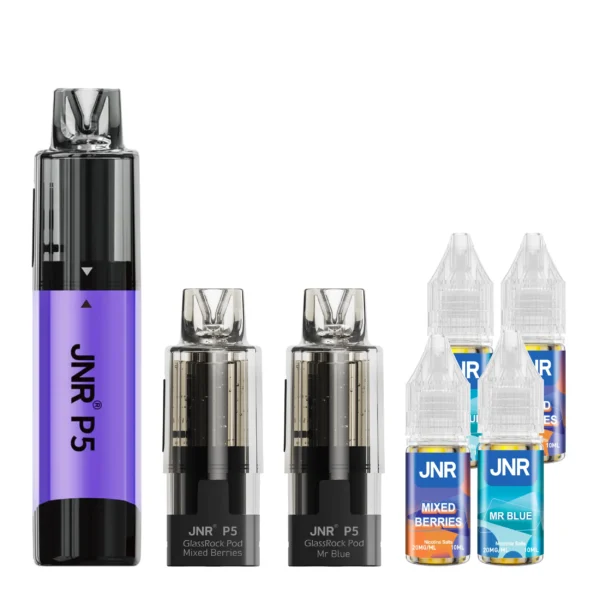
Both the Stellarc and GlassRock kits include the same components:
- Battery module — the main device (bottom half with screen/charging port)
- 2 × pre-filled pods — each is a 2mL tank + 10mL refill container, already assembled
- 4 × 10mL e-liquid bottles — two bottles per flavor, matching the two pods
- USB-C cable
- Quick start guide
Each kit comes with two different flavors (one per pod), except the Watermelon Ice kit which has the same flavor in both. For help choosing, see our JNR Vape Flavors rankings.
Step 2: First-Time Assembly
The pods come pre-assembled (2mL tank already attached to 10mL container) and pre-filled. You do NOT need to fill anything before your first use. Here's what to do:
2a. Remove protective covers. Each pod has a silicone cap on the mouthpiece and a sticker on the base contacts. Peel both off. Don't remove the silicone plug on the side of the container — that's the refill port you'll use later.
2b. Attach pod to battery. Align the pod with the battery module — the magnetic connection is orientation-specific, so it only fits one way. Press down firmly until the magnets click. On the Stellarc, twist slightly to engage the lock mechanism.
2c. Wait 60 seconds. Before your first puff, let the pod sit connected for about a minute. This allows the e-liquid to fully saturate the dual mesh coil through the auto-feed system. Skipping this can cause a dry hit on your very first draw.
2d. Take 3–4 gentle primer puffs. Short, light inhales to get the wicking flowing. After the primer puffs, you'll taste full flavor. You're ready to go.
⚠️ Important: Do NOT separate the 2mL pod tank from the 10mL refill container during assembly. They come pre-connected and are designed to stay that way. If you accidentally pull them apart, reattaching can be difficult and may cause leaks. The refill port on the side of the container handles all your refilling needs without disassembly.
Step 3: Daily Use — Draw-Activated Vaping
Both JNR devices are draw-activated — no buttons to press. Just inhale through the mouthpiece and the device fires automatically.
Vaping Modes (P4 Stellarc)
The Stellarc offers two power modes, accessible through the screen interface:
Regular Mode (30W): Lower power, cooler vapor, milder throat hit. Better for flavor preservation and chain vaping. Uses less juice and less battery. This is the default mode and what I'd recommend for everyday use.
Boost Mode (40W): Higher power, warmer and denser vapor, stronger throat hit. Produces more clouds and burns through juice faster. Good for occasional stronger hits, but extended Boost use will accelerate coil degradation. Use sparingly if you want to maximize pod life.
To switch modes, [refer to the quick-start guide included with your device — the toggle method varies by firmware version].
Airflow Adjustment
Both devices have adjustable airflow, though the mechanism differs slightly:
Stellarc: Stepless airflow ring on the base. Rotate clockwise to tighten (MTL draw), counter-clockwise to loosen (restricted DTL). The ring moves smoothly with no detents.
GlassRock: Airflow control with defined notch positions. Offers a slightly wider range than the Stellarc — fully closed is tighter, fully open is airier.
Recommended starting position: Mid-range for both devices. This gives a balanced draw that works with all JNR flavors. Tighten for bold flavors like Blue Razz Ice where you want concentrated taste; loosen for lighter flavors like Miami Mint where an airy draw feels more natural.
Step 4: How to Refill the Container
After roughly 2,000–2,500 puffs, the 10mL auto-refill container will empty. On the GlassRock, you'll see this through the transparent body. On the Stellarc, you'll notice slightly reduced vapor production or the puff count on screen will hint at the usage level.
4a. Remove the pod from the battery by pulling straight up.
4b. Locate the silicone plug on the side of the 10mL container. Pull it out gently — it's snug by design to prevent leaks.
4c. Open one of the included 10mL e-liquid bottles. Insert the nozzle into the refill port and squeeze slowly. Fill until liquid reaches near the top of the container. Don't overfill.
4d. Re-insert the silicone plug firmly. Press until it's flush with the container surface.
4e. Reattach pod to battery. Wait 30 seconds before vaping to let pressure equalize through the auto-feed valve.
Pro tip: Wipe your hands dry before handling the silicone plug. It's small and slippery when wet. Keep a paper towel handy during refills.
Each kit includes 4 × 10mL bottles (2 per flavor). You'll use approximately 1 bottle per refill cycle, giving you about 4 refills from the kit supply before needing to buy replacement pods or additional e-liquid.
Step 5: How to Swap Pods
When the coil degrades and flavor quality drops permanently (typically after ~7,500 puffs on the Stellarc, ~8,500 on the GlassRock), it's time to replace the entire pod.
5a. Pull the old pod off the battery module. Discard responsibly.
5b. Unwrap the new replacement pod. Remove protective caps and stickers from base contacts and mouthpiece.
5c. Align and press the new pod onto the battery until magnets click.
5d. Wait 60 seconds for coil saturation (same as first-time setup), then take 3–4 primer puffs.
The second pod included in your original kit is already assembled and ready — just grab it when your first pod is done. After both kit pods are used, you'll need replacement pods ($21.99 each, includes 2 × 10mL refill bottles).
Step 6: Charging
Both devices charge via USB-C. Plug the included cable into the port on the bottom of the battery module.
| P4 Stellarc | P5 GlassRock | |
|---|---|---|
| Battery | 1,200mAh | 1,900mAh |
| Charge Time (0 → 100%) | 60–90 minutes | 90–120 minutes |
| Charge Frequency (moderate use) | Every 1.5–2 days | Every 2.5–3 days |
| Pass-through Vaping | Yes | Yes |
Both devices support pass-through vaping — you can vape while charging. The screen displays charging progress (battery percentage fills as it charges).
Stellarc-specific: The detachable battery module can be separated from the pod and charged independently. This means you can charge the battery while the pod stays accessible for later reattachment.
Cable tip: Any standard USB-C cable works. The included cable is basic — if you lose it, any phone charger cable will do. Avoid fast-charge power adapters above 10W; standard 5V/1A or 5V/2A adapters are ideal.
Troubleshooting — Common Issues
No vapor on draw
Cause: Coil not saturated, pod not fully connected, or battery dead.
Fix: Check the magnetic connection — reseat the pod firmly. If new, wait 60 seconds and take primer puffs. If the battery indicator is empty, charge the device. If the pod has 7,000+ puffs on it, the coil may be dead — swap to a new pod.
Burnt or harsh taste
Cause: Coil degradation or dry tank (container empty and auto-feed has nothing to supply).
Fix: Check the refill container level — if empty, refill from an e-liquid bottle. If the container has juice but the taste is burnt, the coil is degraded and the pod needs replacement. Do not continue vaping on a burnt coil — it produces harmful byproducts.
Leaking from pod connection
Cause: Pod not seated properly, silicone plug not fully inserted after refill, or pod/container separation.
Fix: Remove the pod, wipe both the pod base and battery contacts with a dry cloth, check the silicone refill plug is flush, and reattach firmly. If leaking persists, the pod seal may be compromised — replace it.
Auto-refill not feeding
Cause: Air pressure imbalance after refilling, or juice too thick for the valve.
Fix: After refilling, hold the device upright for 30 seconds to let gravity assist the valve. If using third-party e-liquid, ensure VG/PG ratio is 60/40 or thinner — high-VG juices can clog the one-way valve. JNR's own sugar-free formulas are optimized for this system.
Screen not turning on (Stellarc)
Cause: Battery fully depleted or firmware glitch.
Fix: Plug in USB-C and wait 5 minutes. If the screen activates during charging, the battery was simply dead. If it doesn't respond after 10 minutes of charging, try a different cable/adapter. In rare cases, detaching and reattaching the battery module resets the screen.
Maintenance Tips for Maximum Pod Life
Store upright when possible. The auto-feed valve works best when gravity assists the flow. Storing the device on its side won't damage it, but upright storage reduces the chance of air pockets forming in the feed system.
Don't chain-vape in Boost mode. Extended high-power use heats the coil faster than the auto-refill can supply juice, which can cause momentary dry hits and accelerate coil degradation. If you chain-vape, stick to Regular mode.
Keep the charging contacts clean. Wipe the magnetic contacts on both the pod base and battery module with a dry cloth every few weeks. E-liquid residue on the contacts can interfere with the connection.
Refill before completely empty. The auto-feed mechanism works best with some liquid remaining in the container. Running it bone-dry can introduce air into the valve, causing temporary feeding issues. Refill when low, not when empty.
Use JNR's included e-liquid first. The formulas are optimized for the 1.2Ω dual mesh coil and the auto-feed viscosity. If you switch to third-party juice, stick with 50/50 or 60/40 VG/PG blends and sugar-free options when possible. More on JNR's formula in our flavors guide.
Frequently Asked Questions
How long does it take to set up a JNR vape for the first time?
About 5 minutes including unboxing, reading the quick-start guide, attaching the pod, and doing primer puffs. After your first setup, subsequent pod swaps take under a minute.
Can I use JNR without ever refilling?
Partially. Each kit pod comes pre-filled with 12mL (2mL tank + 10mL container). You can vape through that entire supply without refilling — that's roughly 2,000–2,500 puffs. After that, you either refill the container from the included bottles or swap to the second pod. Eventually, you'll need to refill or buy new pods to continue using the device.
Is JNR harder to use than regular disposables?
Slightly, yes. A sealed disposable requires zero setup — just puff. JNR requires initial pod attachment, periodic refilling, and eventual pod swaps. The trade-off is dramatically lower cost and better long-term flavor quality. Most people get comfortable with the system within their first refill cycle.
What happens if I accidentally inhale e-liquid?
Minor spitback (a few drops on the tongue) is normal, especially after refilling or on very full pods. It's not harmful in small amounts but is unpleasant. Taking gentle primer puffs after refilling minimizes this. If spitback is persistent, check that the pod is fully seated and the silicone plug is secure.
Can I fly with a JNR vape?
TSA allows vaping devices in carry-on luggage only (not checked bags). Remove the pod from the battery before packing — altitude pressure changes can cause leaking through the auto-feed valve. Store the pod upright in a sealed bag. Using the Stellarc's twist-to-lock mode prevents accidental activation during travel.
- JNR Vape — Complete Brand Guide
- JNR Vape Flavors — Complete List & Rankings
- JNR Stellarc 100K Review
- JNR P5 GlassRock Review
- JNR Vape Pods — Replacement & Refill Guide
- JNR Vape Near Me — Where to Buy
- JNR vs Foger Vape Comparison
- JNR Vape Price — Cost Comparison
- Shop P4 Stellarc Kit
- Shop P5 GlassRock Kit
 3")